
While owning a dog means plenty of cuddles, playtime, and neighborhood walks, it also comes with a lot of responsibility. From staying up-to-date on vaccines and clipping nails to brushing teeth and grooming, they require regular care to ensure good health and happiness. Cleaning your dog’s ears is one task that falls under the not-so-fun category but should be high on your priority list to avoid infection or irritation.
Ear infections are common in certain long-eared breeds, such as Cocker Spaniels and Basset Hounds as well as dogs with underlying allergies. Dog owners should never put anything in their dog’s ears if an infection is suspected and should get them to their veterinarian right away. To avoid painful ear infections, follow these tips and tricks to ensure your dog’s ears remain clean and healthy.
1. Understand Your Dog’s Ear Anatomy
A dog’s ear canal forms an “L” shape. It’s very long, with a 90-degree curve that is difficult to reach. A dog’s eardrum sits beyond this 90-degree curve, which means there is a relatively low risk of harming your dog while you’re attempting to clean its ears. Since most of your dog’s ear canal isn’t accessible, a gentle liquid cleanser is needed to reach and clear the entire area. You should also know what a healthy dog's ear looks like—light pink with no apparent dirt or inflammation. The American Kennel Club provides insight on how to tell when your dog’s ears are ready for a cleaning.
2. Purchase an Ear Cleanser
A general-purpose ear cleanser is an essential part of a healthy ear-cleaning routine. These are specially designed for non-infected ears and help clean and remove debris from the ear canal. It can be used up to 1-3 times weekly with a cotton ball or gauze to gently wipe away excess wax and any visible debris. Dogs who do not suffer from chronic ear infections will not need their ears cleaned this often. It is ideal to check the ears after a regular bath and clean the ears if any visible wax or debris is noted. For dogs who swim regularly, more frequent cleanings will help prevent ear infections from forming.
3. Avoid Harsh Cleaners or Instruments
The number one way a dog’s ears are harmed during the cleaning process is by using irritants such as alcohol-based wipes or Q-Tips that can put too much pressure on the ear canal. Hydrogen peroxide is also not acceptable, as it can irritate healthy skin cells and sensitive tissue. Stick to gentle ear cleansers designed for pets, along with cotton balls or gauze.
4. Clean When Your Dog is Calm and Relaxed
An energized dog will not stay still and calm for an ear cleaning. Wait until after a walk, playtime or just before bedtime to clean your dog’s ears, when they are relaxed and calm. Give them gentle rubs and pets to relax them and offer a tasty treat when you are finished with the cleaning.
To clean your dog’s ears once they’re relaxed:
- Hold their ear open by using a gentle upward pull on the ear flap while your dog is sitting or laying down and fill the ear canal with cleanser.
- Fill their ear until you see the fluid, then gently pinch the ear closed to contain it.
- Gently massage the base of the ear for at least 30 seconds. You should hear the fluid swishing around. This action will loosen up any debris deeper in the ear canal that you cannot reach.
- Release your pinch on the ear canal and allow your dog to shake just like they do when they’re wet, which will help to loosen debris further and bring it up higher in their ear canal.
- Use gauze or a cotton ball and gently wipe away any debris as far into the ear canal as you can comfortably reach—but no deeper than one knuckle. We find using a gentle twisting motion with the gauze or cotton ball works well to help remove the debris and wax. Repeat steps 1-5 until the gauze/cotton balls are coming out clean and the ear canal is free of debris.
** If your dog is more nervous or fearful of having their ears cleaned, try using Dr. Bergman's cotton ball technique. Instead of pouring the cleaner into the ears as is step 1, saturate several cotton balls with the cleaner. Then, while holding your dog's ear up, gently place the saturated cotton ball at the top of the ear canal, relax the ear gently pinching the ear closed to contain the cotton ball and massage the base of the ear as instructed in step 3. Continue with steps 4 and 5 until your pets ear is clean. Offer a treat after the cleaning for positive reinforcement.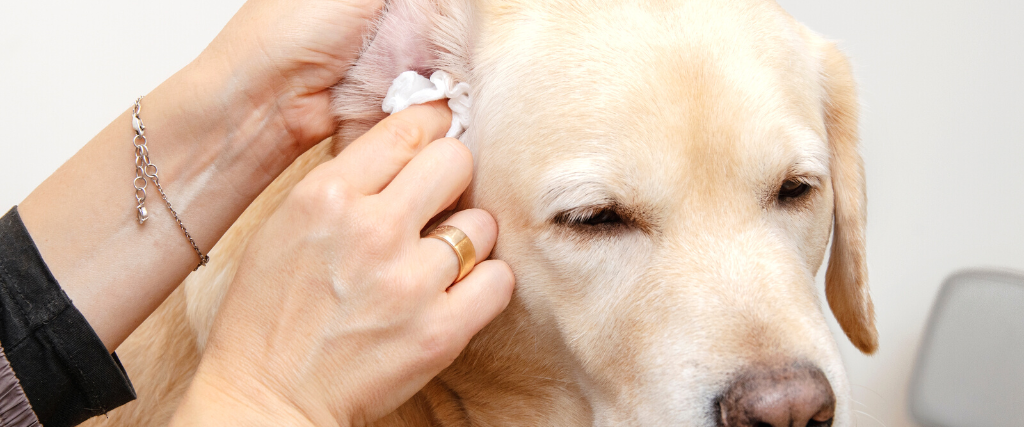
5. Have a Towel Handy
Large breed dogs have large ear canals that will hold a considerable volume of ear cleanser. You will get sprayed when they shake after you’ve massaged their ear, and the ear cleanser will likely end up all over your dog’s face. You can use the towel to block the spray from hitting you and gently wipe their face afterward.
If you see excessive amounts of wax, smell a foul odor, blood is present, or your dog appears to be in pain from the cleaning, stop cleaning immediately and schedule a veterinarian visit. Those are signs of infection. The ASPCA details additional signs of ear infection.